Weechat for Slack and IRC
Weechat is a terminal TUI based client for IRC and Slack. I use it primarily for work Slack because it uses far less memory than Slack in the browser. Overall, it's small and very (very!) configurable. It can also work with other messaging protocols, often via Bitlbee, including Discord, Twitter and Telegram. This is the first post in a series covering Weechat.
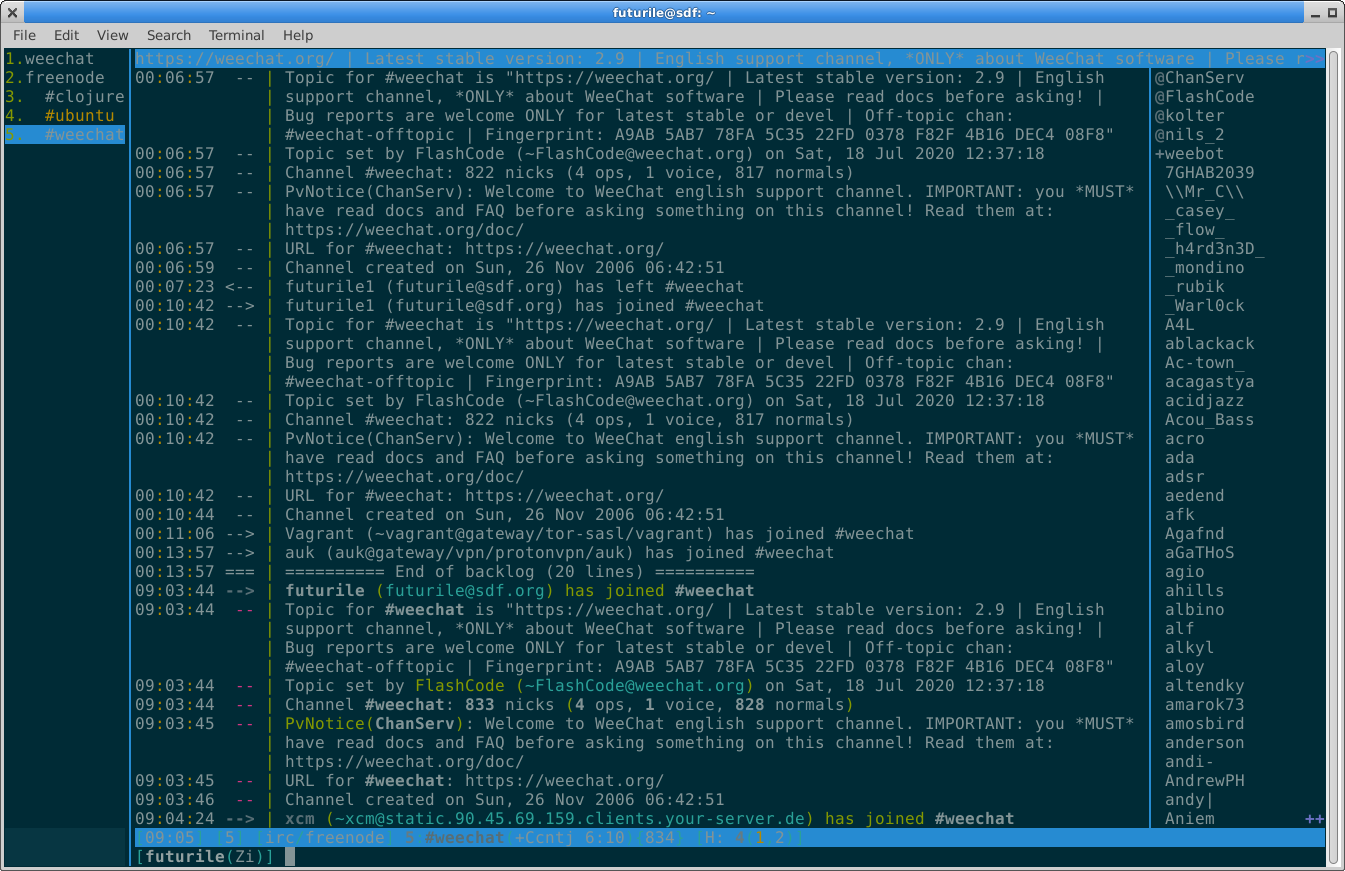
Figure 1: Final outcome - Weechat on the Freenode IRC network
Weechat is very easy to use for a text-based system, it works with the mouse and the commands all have documentation. If you're used to Slack in the browser then using it through Weechat will be just as easy.
The Weechat documentation is comprehensive more than accessible: all the commands are well documented in the help system so that's the easiest point of reference.
The main problem is it's too configurable - you can spend an endless amount of time messing with the settings and colours!
In this series I'm going to show setting Weechat 2.9 up on Ubuntu with IRC on Freenode. I'll then cover configuring it with various settings. Finally, I'm going to add Slack via the Wee-slack script. My goal is that by the end we'll have a solid set-up that can be used without too much fuss.
I'm on Ubuntu 18.04 LTS and we'll be using Weechat 2.9.
This post is part 1 of a four part series:
- Weechat for Slack and IRC (Part 1) - Getting Started
- Weechat for Slack and IRC (Part 2) - Configuration and basic Add-ons
- Weechat for Slack and IRC (Part 3) - Slack in Weechat
- Weechat for Slack and IRC (Part 4) - Notifications and full configuration
Installing Weechat
Weechat is available in Ubuntu, but it's missing some of the extensions that we need. Instead we'll use the packaged version from the Weechat team which is available through a repository. There's a page [1] on their site with all this information.
When you do an apt update it complains there's no security key so at that point you can note it down and use apt-key to set it up properly. The commands are:
# add-apt-repository ppa:<user>/<repository-name>
$ sudo add-apt-repository "deb https://weechat.org/ubuntu bionic main"

# for versions after weechat 2.6
$ sudo apt install python3-websocket

$ sudo apt-get update
<complains about lack of key>

# replace <PUBKEY> with the key you saw
$ sudo apt-key adv --keyserver keyserver.ubuntu.com -recv-keys <PUBKEY>

# now install it
$ apt install weechat

$ weechat --version
2.9
| [1] | Weechat download |
Terminals, environments and fonts
To use terminal based Slack/IRC we need 256 colours and emojis: whether I like it not my co-workers appear to talk only in emojis some times - :head-explode: :volcano: :stars:.
There are three things required:
- A terminal emulator that support UTF-8 fallback fonts
- Locale has to be set to UTF-8
- TERM environment variable to be set correctly.
On this blog I've written about XTerm as it's my preferred terminal emulator because it's small, flexible and uses less memory (see the parallel!). However, on 18.04 LTS it doesn't show emoji's (UTF-8) correctly. The latest version of XTerm seems to have resolved the issue (I did a quick test by downloading and compiling it), but I prefer to use the packaged version. After I upgrade to 20.04 LTS I'll test again.
For now I'm using a specific terminal emulator for Weechat - I'm using 18.04 LTS's packaged gnome-terminal (version 3.28.2 with VTE 0.52.2). The important part there is the VTE bit which has support for UTF-8.
I'm not going to cover the gory details of setting up UTF-8 and TERM, but what you should see is something like:
# it needs to be some form of UTF-8
$ locale

LANG=en_GB.UTF-8
LANGUAGE=en_GB:en
LC_CTYPE="en_GB.UTF-8"
LC_NUMERIC="en_GB.UTF-8"
<more output>

# for maximum colours you need a 256color term
$ echo $TERM
xterm-256color

# check colours are working with this - outputs a colour table
weechat -c

# fonts needed for emoji
sudo apt install fonts-noto-color-emoji emoji-one
Start a gnome-terminal do a search for an emoji on the Web and cut-n-paste it into the terminal to check it displays properly.
Next in gnome-terminal's menus go to Edit->Preferences. I've created a new 'Profile' called Weechat and in there I set colours to be 'Solarized dark' and I'm using 'Monospace Regular' 12 as my font.
Weechat standard layout
Having started Weechat lets have a look at it's layout. You'll recognise the similarity to many other IRC Weechat programs like XChat. It's worth remembering the terms though as you have to use them when you're messing with the settings.
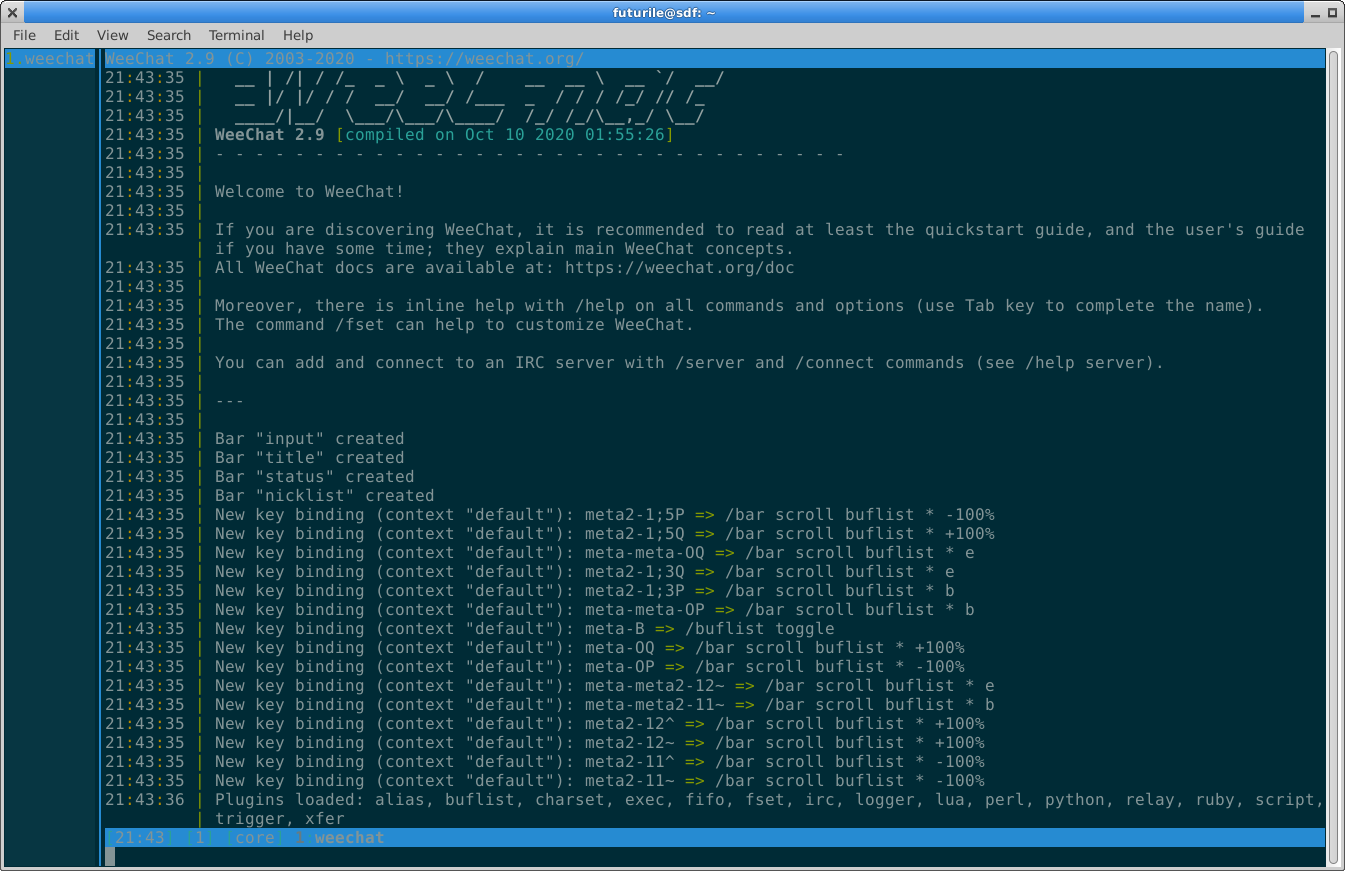
Figure 2: Initial start-up layout of Weechat
In Figure 2 you can see on the left hand side you've got a bar running vertically down the side of the screen: this is called the Buffer List Bar or buflist in the settings. It keeps a list of the buffers - in the example there's just 1. Weechat because we haven't connected to any servers yet.
When you are connected to an IRC or Slack server then the buffer list is populated with a server buffer and a set of channel buffers. Earlier in Figure 1 we have connected to the Freenode IRC server which has it's own buffer in the buffer list and we also have buffers for the #clojure, #ubuntu and #weechat channels. Notice that the channel buffers are offset by two spaces so you can see that they're associated with the Freenode server.
In the middle we have the Chat Area which in the Figure 2 screenshot is showing messages from the main Weechat as it starts up. In the Figure 1 screenshot the chat area is being used to show the chat from the #ubuntu channel on Freenode.
Above the chat area we have the Title Bar which is the bar along the top: in Figure 2 it's showing the copyright and URL for Weechat - if it's difficult to see right click and 'view image' to get the full image. Normally you will see the title of the channel and any useful information about it (see Figure 1 at the top for an example).
The Status bar is below the chat area, it's the horizontal bar that shows the time at the far left. This bar is used to store various bits of status like the channel we're active in, the number of people in the channel and channels where there are outstanding messages.
The Input bar is the area at the bottom where the cursor is. This is where you type your commands and messages. It's generally going to display just your nickname in square brackets and the cursor.
On the right we have the Nicklist bar, see Figure 1, for an example. This bar has the nicknames of all of the people who are in that particular channel.
The layout in Figure 1 is the most common one, and is the one I'll stick with in these posts. But, it's worth knowing that Weechat can open up new 'Windows' so you can monitor more than one channel at the same time - along with other sophisticated capabilities for setting layouts.
Enabling the mouse
The first thing is to get the mouse working so we can easily move between buffers - we'll learn the keyboard shortcuts later. Input bar on the bottom enter:
/mouse enable
Notice that all commands in Weechat start with a forward slash. With the mouse enabled we can easily switch between buffers by clicking on the name of the buffer in the buffer list (vertical bar on the left). We can also easily scroll through settings.
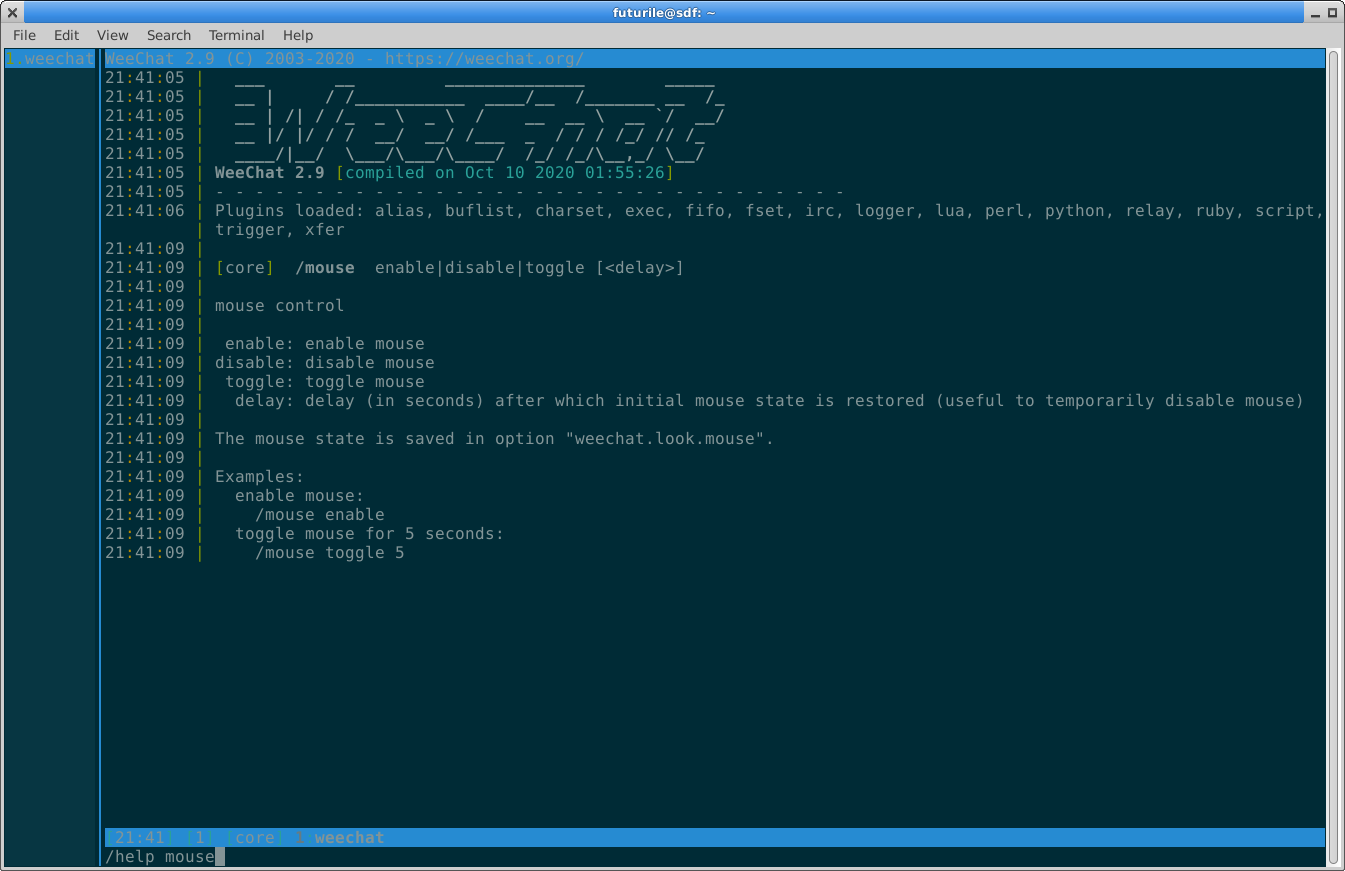
Figure 3: Mouse is configured
If you have problems with a command or need a refresher then do:
/help
/help help
/help mouse
Notice that when you put the command in for help you don't provide a forward slash - it's "mouse" not "/mouse". That was a bit confusing to me!
When you use the /help command or if there's an error in the settings then the output of the command with go to the main Weechat buffer.
Weechat settings
All settings within Weechat are viewed and changed from within Weechat itself - using a settings buffer. Although the settings are stored in files it's recommended that you do not edit these files directly. This is the part I find the most annoying about Weechat as you can't really edit it by hand. But, as there are so many settings you have to know how to browse through them all using the settings system.
To get to the settings buffer do:
/set
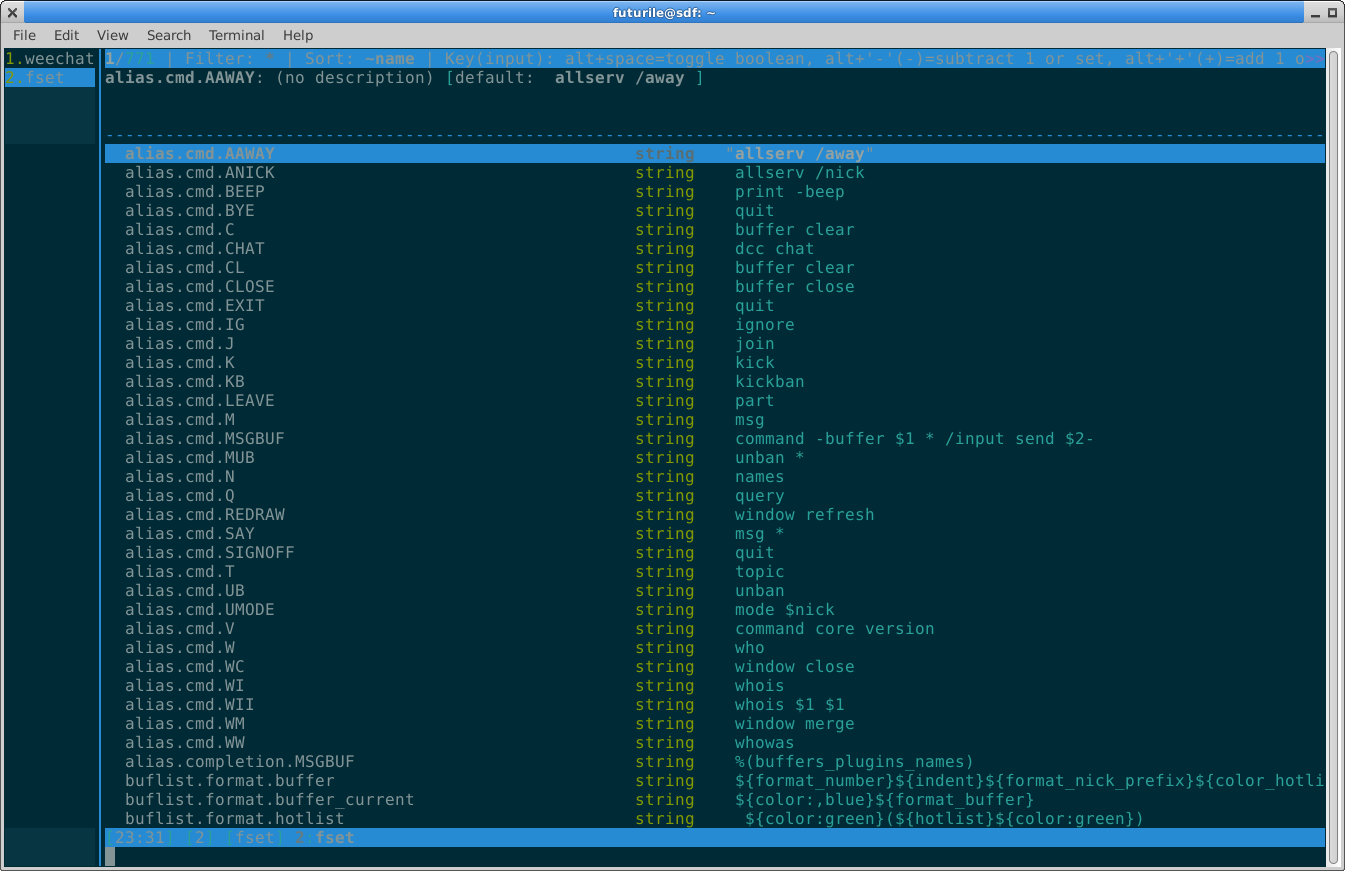
Figure 4: the settings buffer used to view and set everything
We can scroll down through the settings, using either the mouse or keyboard (arrow keys and <pg-up>/<pg-down>) to explore the settings. There's help for each setting in the top bar.
As there are so many settings it's easier to filter the display to just the section we want - otherwise you have to scroll a lot to find the setting you want! We can limit the display to any section of the settings and we can use simple regex. To do this put in a space and then the search we want in the input bar:
# to see all the settings for the buffer list
<space>buflist

# reset the view back to all settings
<space>*
Settings can be boolean, integers or text. Lets change a boolean:
# filter the view to irc.look by typing in the input bar
<space> irc.look

# scroll to the setting
irc.look.part_closes_buffer

# toggles the option on
<Alt><Space>

# if you'd like to do it from the input area at the bottom
/fset -toggle
To change the setting we can either use <Alt><Space> or we can type in the input area /fset -toggle. At this point we have set irc.look.part_closes_buffer to be on - this means when we leave a channel with /part Weechat will close that buffer automatically.
There are also settings where we want to add some text, lets change one of those:
# filter the view to irc.look.buffer
<space> irc.look.server

# it shows one option: irc.look.server_buffer
# the help at the top gives us three options
# there are three ways to edit:
<Alt><Enter>
<Alt>f <Alt>n
/fset -setnew

# Each one puts the following on the input line
# we change it to be independent
/set irc.look.server_buffer independent
At this point irc.look.server_buffer is set to independent - this means that when we connect to multiple servers the channels will be clustered under the server's buffer so we can see how they are related. We saw the impact of this setting in Figure 1 above.
This last example should make it clear that we can also input the full option into input bar at the bottom of the fset buffer. This is useful if you want to keep a list of settings that you always have. For example in the input bar (at the bottom) we could do:
/set irc.look.color_nicks_in_nicklist on
This means that each nick will have a different colour in the nicklist and that color will be used in the chat area so it's easier to relate the name as we have the colour as a hint.
If at some point we make a change and we want to revert it back, we can do:
# filter the settings to show the setting
<space>irc.look.server_buffer

# there are two ways to reset a setting
<Alt>f <Alt>r
/fset -reset
At this point irc.look.server_buffer will be back to merge_with_core. Lets change a couple more settings:
# equivalent to mouse on
/set weechat.look.mouse on

# you've seen this before
/set irc.look.server_buffer independent

# the default username that you want to use on IRC
# pick a cool name!
/set irc.server_default.username "name you want to use"

# commonly if the name is taken you want to use a variant
/set irc.server_default.nicks "name,name1,name2,name3,name4"

# title bar on the top resize to multiple lines if needed to fit text,
# very useful for buffers like Settings where the help flows over more
# than one line
/set weechat.bar.title.size 0
The last trick that fset has up its sleeve is that it can show you the differences from the defaults, so we can see just the settings we've changed:
#<space> and d - for diff
<space>d

Figure 5: Showing settings diff
Then the most important thing to remember is that you have save settings, to do this do:
/save
Setting up Freenode
With a few basic settings done we're now ready to configure Weechat to connect to a chat server. We'll start with IRC, and commonly I want to use Freenode. To set-up Freenode we could use:
# this adds the server and specifies to use ssl
/server add freenode chat.freenode.net/7000 -ssl
/set irc.server.freenode.nicks "bob,bob1"
/set irc.server.freenode.username "bob"
/set irc.server.freenode.realname ""
The /server commands adds a specific IRC server, in this case we're adding one called freenode and we've provided a server address, port and the fact that we want Weechat to connect using SSL. We've also provided a specific nickname to be used for this server. In Figure 6 the specific settings I've set are shown.
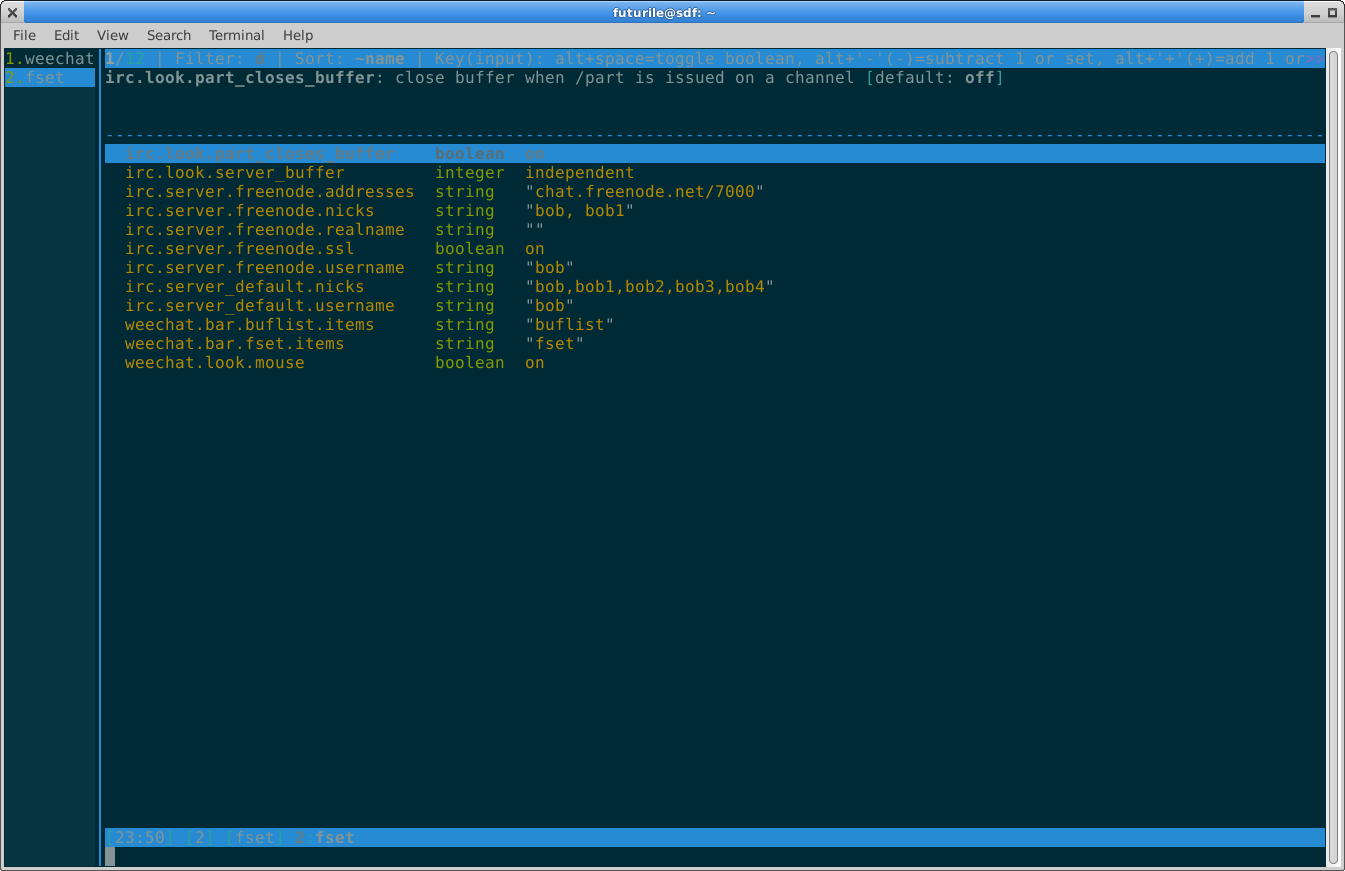
Figure 6: Basic Freenode settings
To check that the SSL is working correctly lets connect to the server:
/connect freenode
A new buffer called 'freenode' is created which has the freenode server's output. Scroll up in this buffer to see the messages that the server sent when we connected to it.
To check that SSL is working correctly there should be output like this:
irc: connecting to server chat.freenode.net/7000 (SSL)...
23:44 -- gnutls: connected using 2048-bit Diffie-Hellman shared secret exchange
23:44 -- gnutls: receiving 2 certificates
There's also see a Z is the User mode text that's output in the server log buffer when we connect:
User mode [+Zi] by bob1
Finally, you can check in the settings within Weechat:
# start the settings buffer
/set

# limit it to just showing the freenode settings by typing into the text input
<space>irc.server.freenode

# you should see that SSL is set (or use /set irc.server.freenode.ssl "on")
irc.server.freenode.ssl "on"
Registering Nick on Freenode
If you're going to take part in Freenode (or similar) then you'll want to use the same Nickname so that people associate your handle with you. There's more information on how to do this in the Freenode Nickname Registration page. The short version is:
# 1. from the freenode buffer send the following command
/msg nickserv register <your_password> <your_email_address>

# 2. verify the email that you receive

# 3. 'login' to your nickname
/msg nickserv identify <nickname> your-password

# 4. confirm that you're logged in
/msg nickserv info <nick-name>
In Weechat make sure that the nickname settings match:
# the nickname that you've chosen and any alternatives
/set irc.server.freenode.nicks "bob,bob1"
# the nickname that you've chosen
/set irc.server.freenode.username "bob"
It's a bit annoying having to /msg the Nickserv each time, so we can store the identity password in an encrypted file. Weechat will encrypt the file and then you can use any 'variables' you set in other commands.
# set-up a secure password to decrypt on start-up
/secure passphrase <some-password>
The impact of this setting is that the password you choose will need to be typed into weechat every time it starts - so it can decrypt the secure area.
We now store the password for our Nickserv identity in a variable (in this example it's called 'freenode_password'. This variable is then used to provide a SASL password for authentication:
# create a 'freenode_password' in the secure storage
# use that password to define a sasl_password
/secure set freenode_password <nickserv-password>

# weechat will use the stored password to login to freenode
/set irc.server.freenode.sasl_password "${sec.data.freenode_password}"

# the sasl_username has to be set to the one with the NickServ.
/set irc.server.freenode.sasl_username "mynick"
If you're successful then you'll see
irc: client capability, requesting: sasl
irc: client capability, enabled: sasl
You are now logged in as bob. (bob1!somehost@mydomain.org)
SASL authentication successful
Finally, in settings you can tell Weechat the channels you want to join and whether to connect to this server automatically:
# comma separated (no spaces) list of channels to join
/set irc.server.freenode.autojoin "#clojure,#ubuntu,#weechat"

# automatically connect to this server when Weechat is started
/set irc.server.freenode.autoconnect on
Don't forget to use /save to save the configuration to the files on disk.
IRC Commands
There's great introductions to IRC so I'm not going to cover these in great depth. But you can get by with the following:
| Command | Description Notes |
|---|---|
| /server list | List servers that Weechat knows about. |
| /connect <server> | Connect to the specified server. for example /connect freenode |
| /list -re <regular-expression> | Search for a particular channel on the server |
| /join #<channel-name> | Join a channel, e.g. /join #clojure |
| /query <person> <message> | Opens a private channel if no message is provided, or sends a private message |
| /whois <nick> | Query information about a user. |
| /me <message> | Send a ctcp action to the channel. Similar to an emoji, /me runs away and hides. |
| /leave #<channel-name> | Leave a channel. Also /part |
| /away [<message] | Sets status as away, if someone msg's you they'll see you're away |
| /disconnect <server> | Disconnect from a server. |
| /quit | Quit from weechat. |
These commands are mostly done from the server buffer itself. So for me I'd be in the freenode buffer and then would do:
# connect to freenode - we set it up earlier
/connect freenode

# search for channels about Clojure
/list -re #clojure*

# join channels
/join #clojure

# query a user for information about them
/whois <your_user_name>

# leave the channel and end the server connection
/leave #clojure
/disconnect freenode
Managing Buffers
When you're using lots of channels it's important to be able to switch between them easily. Weechat has lots of keyboard shortcuts for this, but the best aid is to add the following:
/trigger add numberjump modifier "2000|input_text_for_buffer"
"${tg_string} =~ ^/[0-9]+$" "=/([0-9]+)=/buffer *${re:1}=" ""
This is a single line - so you'll need to cut-n-paste this into a file and then into Weechat.
This settings lets you jump between buffers with /<N>, so to go to the first buffer we do /1, to change to the 12 we do /12. It's mentioned in the FAQ and I've found it the easiest way to navigate - admittedly it uses / which is a little finger and might not be perfect for everyone.
There's lots of shortcuts for changing buffers:
| Key | Command | Description |
|---|---|---|
| <Alt>a | /input jump_smart | Switch to the next buffer with activity |
| /<N> | /buffer <N> | Switch to the specified buffer (1-100). Requires a custom mapping. |
| <Alt><N> | /buffer <N> | Switch to the specified buffer (1-9). |
| <Alt><down-arrow> | /buffer +1 | Switch to the next buffer. Alternative is <Ctrl>n or <F6> |
| <Alt><up-arrow> | /buffer -1 | Switch to the previous buffer. Alternative is <Ctrl>p or <F5> |
| <Ctrl>n | /buffer +1 | Switch to the next buffer. Alternative is <Alt><down-arrow> or <F6> |
| <Ctrl>p | /buffer -1 | Switch to the previous buffer. Alternative is <Alt><up-arrow> or <F5> |
| <F6> | /buffer +1 | Switch to the next buffer. Alternatively <Ctrl>n or <Alt><down-arrow> |
| <F5> | /buffer -1 | Switch to the previous buffer. Alternatively <Ctrl>p or <Alt><up-arrow> |
| /close | Close a buffer |
Weechat keeps a list of all the channels that you're in and any activity in them. It shows you channels that have activity in the status bar: in Figure 7: Freenode channels we're in the #weechat channel and on the status bar we can see [H: 4] which is telling us that there's traffic in buffer 4 (the #ubuntu channel). We could jump to it with /4, or another option is <Alt>a which Weechat uses to cycle you through channels that have activity in them.
Figure 7: Final chatting on Freenode channels
There are lots of other keyboard shortcuts so that you can change the layout of the windows, search the backscroll and so forth. Check out the manual for more details.
Weechat Resources
- Weechat, the extensible chat client
- The Quick Start Guide is worth going through.
- Getting started with IRC
- VM Brasseur's two-part series introducing IRC.
- FiXato's guide to WeeChat
- An in-depth guide that goes through the whole UTF-8 (emoji's) and xterm-256 color horror. If you read all of this and think 'oh yeah I know all of this' then realise you have joined the dark side!
Summary
At this point we have a pretty good set-up for using Weechat to access Freenode or any other IRC server. The next step is going to be the various plugins and customisations that we can do.
Posted in Tech Monday 09 November 2020
Tagged with tech weechat irc slack