NeoMutt: introduction to CLI email
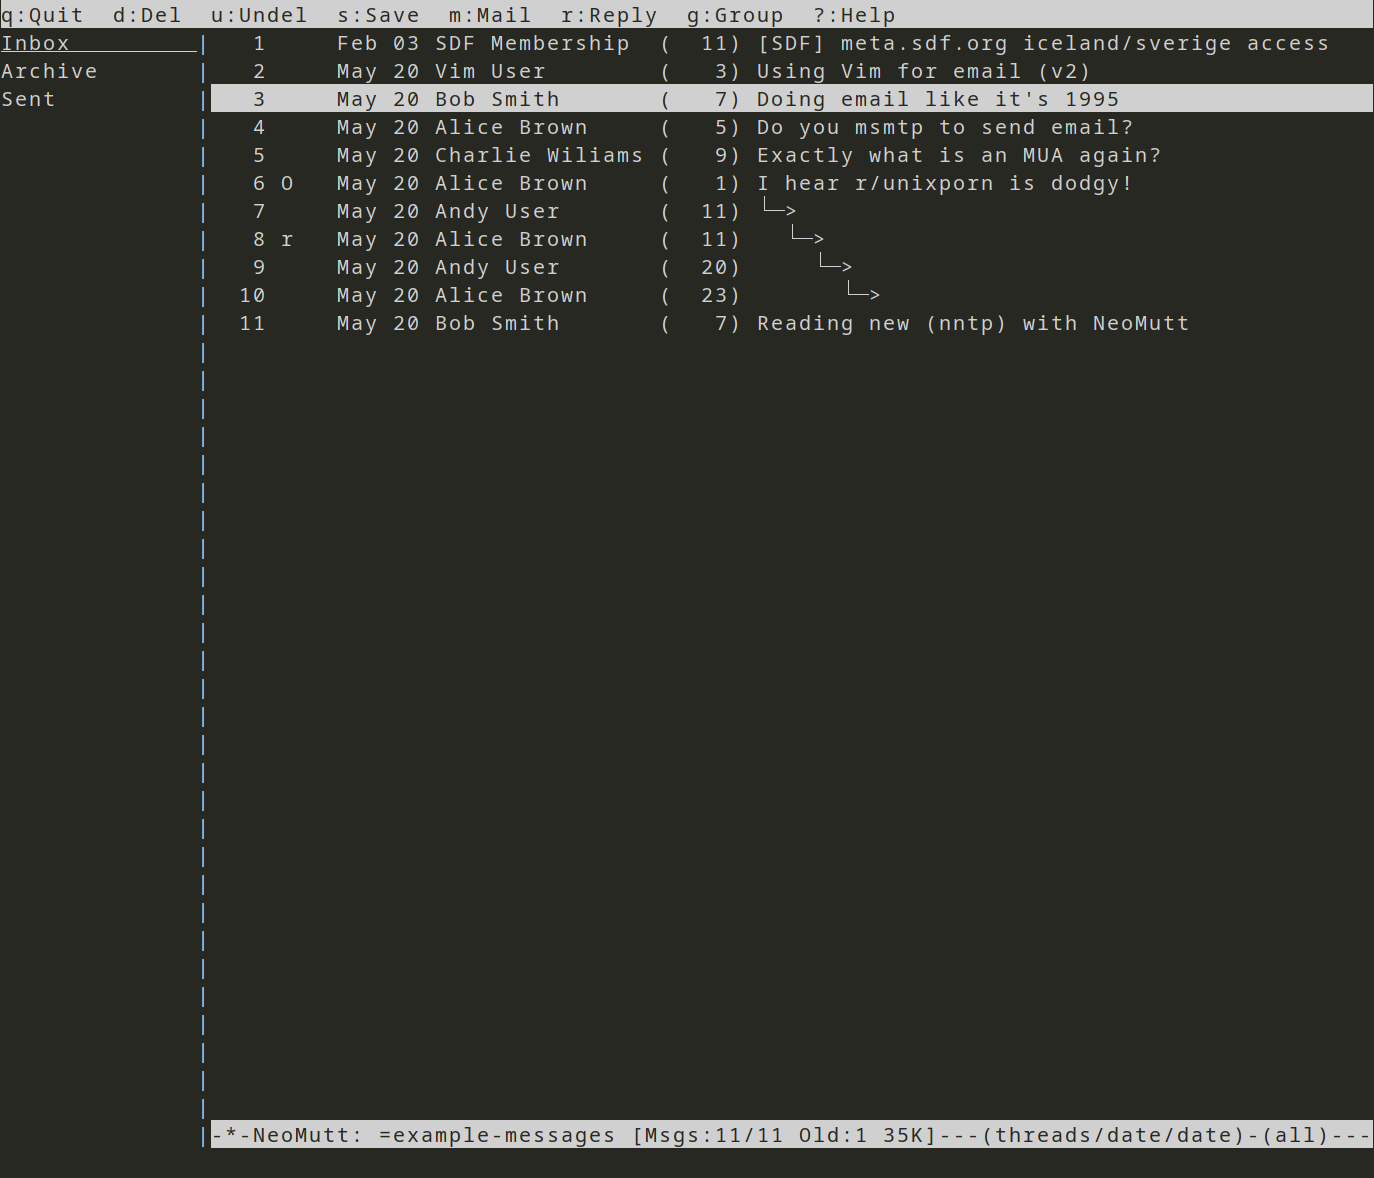
Figure 1 (click to enlarge): NeoMutt running on SDF
Mutt and NeoMutt are two of the most well-known command-line email programs. There's lot of good reasons to use them as they're efficient, flexible and can be used remotely over SSH. They're also cool if you're into CLI's - and who isn't!
That said, they can be pretty difficult to configure. Often there's a lot of cut-n-paste experimentation. As Mutt's been around since 1995 I also find that some examples are out of date, or a bit confusing, as the way we use the Internet has changed a lot since 1995.
In this series of posts my goal is to build configurations for a few different use-cases. At the end we'll have explored the main elements of setting up NeoMutt and we'll have seen how flexible it can be. We'll cover three different ways of using NeoMutt:
- Local mail on a Unix server
- Native IMAP, meaning Neomutt does IMAP
- Mirrored IMAP, mirroring email from an IMAP server locally
In this post we'll cover configuring local email as if using a multi-user Unix server. Great Scott, we're going back to the future! Seriously, the reason this is useful is it explains the world-view that Neomutt has, and that understanding will make it easier to configure more complex set-ups later.
Mutt vs Neomutt
The first decision is whether to use Mutt or Neomutt. Neomutt came from Mutt, it used Mutt as it's upstream and then applied it's own changes on top. These days it's somewhat a fork because NeoMutts added lots of additional features and I'm not sure whether it's merged in upstream Mutt changes recently. These are both projects with long track records where stability is a key value. I've gone with NeoMutt because I wanted some of the enhancements they've added and I like the community around it.
What is an MUA?
To understand NeoMutt's foundations let's go back to the dawn of UNIX history ... or at least to doing email like it's 1995. When Mutt was created the purpose of CLI email clients was to read email while you were in a shell account on a UNIX host.
In that eras email system there were Mail Transfer Agents (MTA), such as Sendmail, that transferred email between UNIX hosts. The host would then transfer email internally using an Mail Delivery Agent (MDA) and the outcome was an email in a file for the user, generally /var/spool/<user_name>. The final stage was for the user to start a Message User Agent (MUA) which would show them the email in their spool file (/var/spool/<user_name>), they'd read it and if they wanted to keep it they'd save it to a local mailbox (often under ~/mail or ~/Mail).
This explains why the originally Mutt expected a single email account, that the email Inbox was called a spool file and why it didn't have IMAP/POP3 capabilities to retrieve remote email - these are all added later, but we can see some of these underlying assumptions.
There was a lot of development of email and email clients (MUA's) in this period. Both CLI ones, and the first versions of graphical ones like Eudora and Netscape Mail. On Unix hosts I think I started with Elm, and then Pine (there's still a maintained version called Alpine ). Mutt coming along in 1995 is actually 'modern' email!
With that background history lets start configuring NeoMutt.
To really follow along with this post you can create an account on the free UNIX shell provider SDF (Super Dimension Fortress). You can signup easily and then access SDF remotely using ssh (e.g. ssh tty.sdf.org). To validate the account find another user to validate you (exercise for the reader!) or make a small donation (see Members FAQ).
Create Neomutt files
The first thing is to create some directories for Neomutt's configuration. Neomutt will use an existing ~/.muttrc or ~/.neomuttrc, but the preferred location for configuration is in ~/.config/neomutt/neomuttrc, so create the following:
mkdir -p ~/.config/neomutt/
mkdir -p ~/.config/neomutt/tmp/
There should already be a ~/mail directory so no need to create it.
The neomuttrc file contains a series of commands, one per line. For the most part this will involve using the set command to define the value of a configuration variable. NeoMutt is extremely liberal about what it will accept for a variable, and then it will internally convert to the correct type. For example, you can specify a directory for a mailbox as a string or as a path and NeoMutt will accept either. This is one of the reasons why different tutorials show slightly different things!
The common types are:
- number (1, 55 -32) - a signed integer, often these are used in format strings
- boolean (yes/no) - often you see these specified as strings but they don't need to be.
- string ("Bob", 'Simon') - an arbitrary string either in single or double quotes
- path (~/mail, =Inbox) - a specialised path that includes support for mailbox shortcuts
- quadoption - expands boolean to four options, yes, no, ask-yes and ask-no.
- email address (blob@example.com) - just the email, without the users full name.
NeoMutts Configuration - Setting and Querying Variables has more details.
Although there's a lot you can configure, the defaults are often sufficient. Check the documentation before cut-n-pasting a setting into your configuration, often it's already been set by NeoMutt so it's not necessary. There are lots of outdated examples that turn on settings which are already the defaults.
Basic user settings
The first settings we need are to identify who we are. The minimum basic user settings are:
# vim: ft=muttrc fdm=marker foldcolumn=2

set tmpdir    = ~/.config/neomutt/tmp

set from      = user@sdf.org
set real_name = "Andy User"
As we're logged into a multi-user host it's useful for temporary files (used when creating an email) to be within our home directory, which is why we're setting tmpdir. It accepts a path type.
Next we set the from address. The users from is the userid that they use to login to SDF, with the domain. Each configuration option is covered in the NeoMutt documentation, notice that the from variables type is an "email address", so it's not provided as a string.
Set real_name to the string that you want to appear in your email from address.
The other important variable is use_from. It determines whether Mutt tries to create a from address when sending email. It's on by default and is important for later configurations, so there's no need to explicitly set it.
Viewing mail

Figure 2 (click to enlarge): Reading email in Pager view
When Neomutt starts it shows a long list of emails, this is the Index view (see Figure 1). Use the arrow keys to move the highlighter up and down in the list. Having selected an email to read hit <enter> to view it.
The view changes to show the email, this is the Pager view (see Figure 2). The pager shows a single email, to move downwards through the email use <space> and to move upwards use the minus sign (-).
It's worth reading the Screens and Menus of the NeoMutt Guide for a description of the different menus.
For viewing the list of emails (Index) and reading emails (Pager) the minimum useful settings are:
set use_threads = yes       # show email in threads in the Index
set pager_index_lines = 6   # show this many lines of the Index when
                            # reading email

set pager_context = 3       # lines of context between pages
set pager_stop = yes        # don't scroll off the end of one message onto
                            # the next

unset markers               # don't show + for wrapped lines in the pager
set mark_old = no           # don't show 'new' emails as old, if user has
The use_threads variable controls whether emails are clustered together in threads in the Index view. There's lots of options for sorting email in the Index, but we'll keep it simple for now.
The pager_index_lines setting controls whether NeoMutt shows a mini-index - the split screen with some of the Index view in it (see the top section of Figure 2). When moving through an email page-by-page it's useful to have some context between pages, the pager_context option sets the number of lines of context that will be shown. Similarly, when you reach the end of an email setting pager_stop prevents scrolling into the next email.
A terminal can be different widths so the default is that NeoMutt will wrap the lines at the side of the terminal and show a plus sign at the end of each line its wrapped. To prevent the plus signs showing we unset markers.
Finally, NeoMutt will show unread emails as Old if you don't read them during the email session, I prefer my emails to just stay at New so set mark_old.
Sending mail
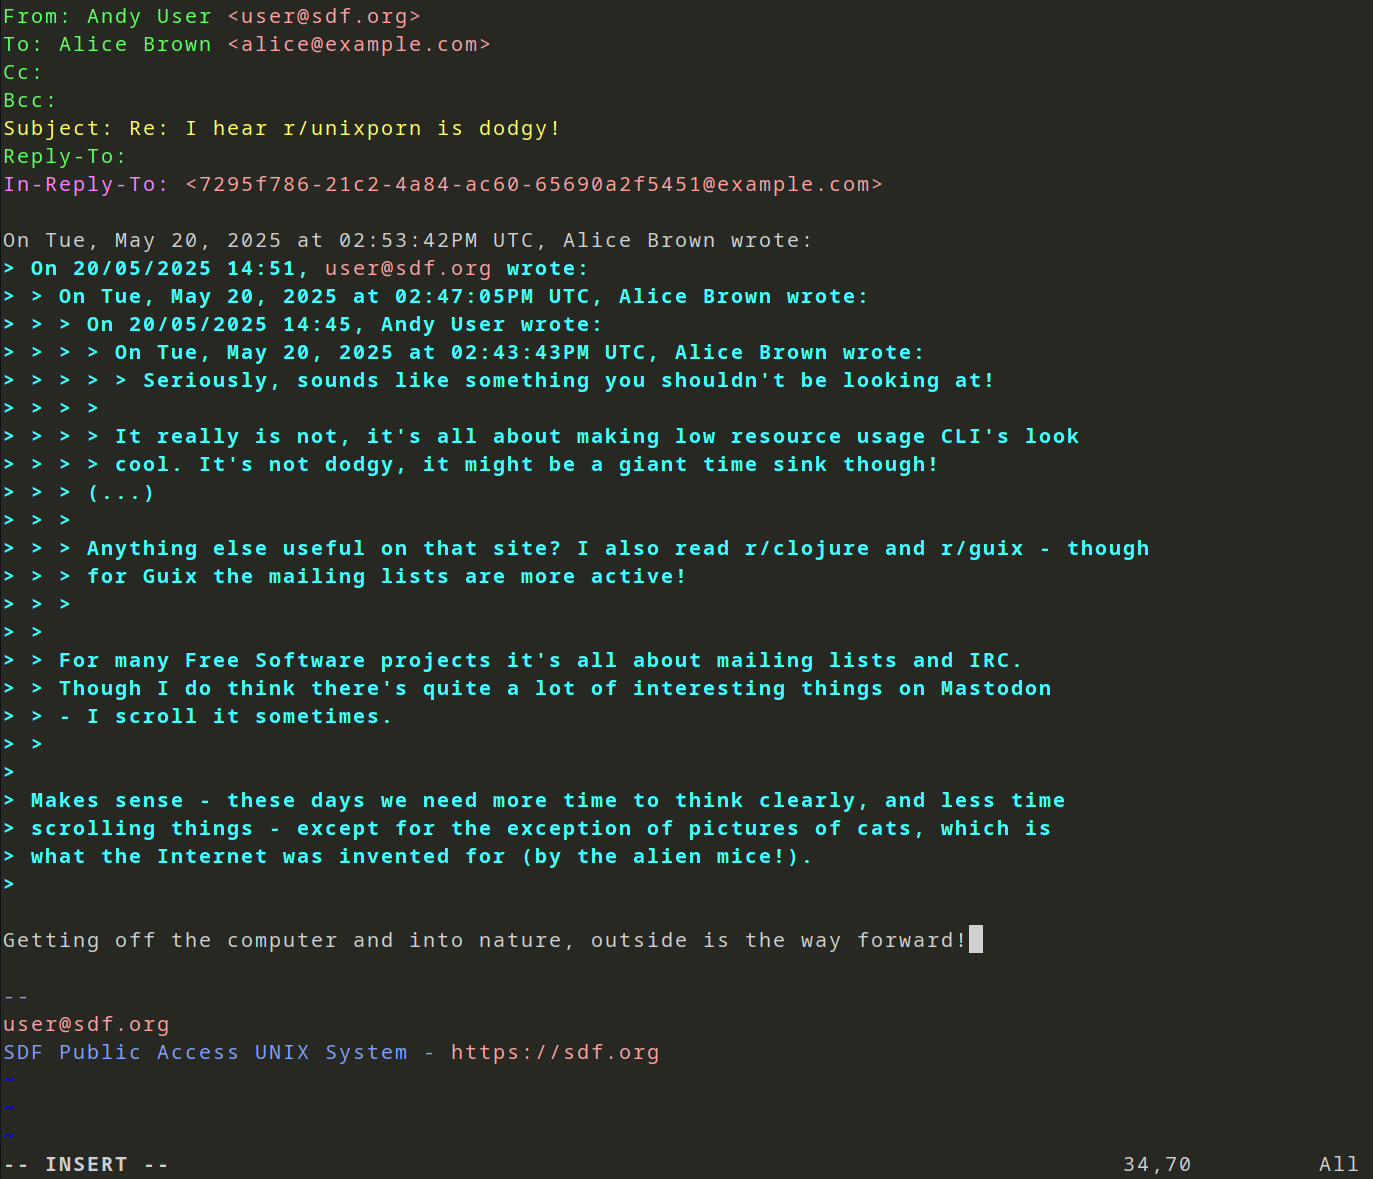
Figure 3 (click to enlarge): Writing an email in Vim
The default key to create an email is m. Mutt will ask you who the email is To: and for a Subject:, it then puts you into the editor to write the rest of the email. See Figure 3 for an example of writing an email in Vim.
After you finish writing the email and save it Mutt puts you into the Compose menu where you can check things like who it's being sent to, attach any files and so forth (see Figure 4 for an example).
Similarly, to reply to an email that's highlighted in the Index view hit the r key and Mutt will put you into the editor to write the reply.
For sending email here are the basic settings:
set edit_headers = yes    # allow user to edit message headers
set editor       = "vim"  # define which editor to use

set fast_reply   = yes    # skip initial prompts when replying
set include      = yes    # include the message we're replying to
When writing an email in your editor it's useful to be able to alter the subject and recipients, which is what edit_headers is for.
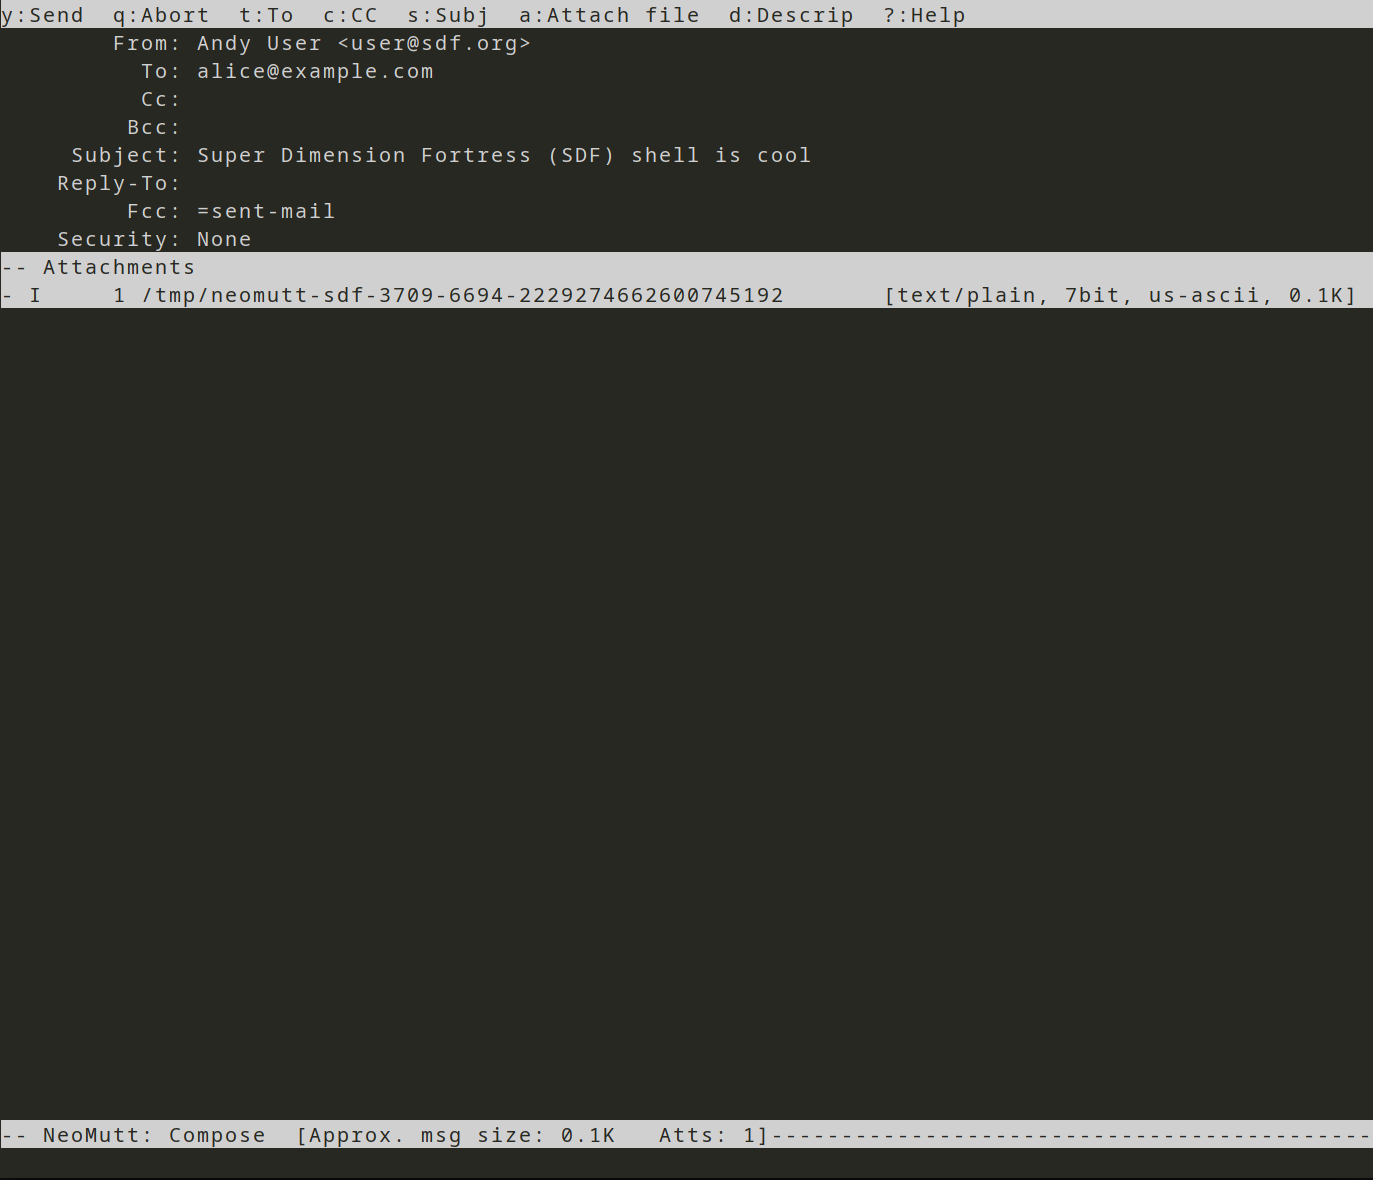
Figure 4 (click to enlarge): Compose menu in NeoMutt
The default editor that's used is whatever the shell's $EDITOR is, to be more specific use the editor setting.
Rather than asking for recipients the fast_reply setting lets you skip this, NeoMutt will use the address of the email that's highlighted in the Index. While setting include will automatically add the message we're replying to.
Sidebar view
Most email clients show a sidebar with different mailboxes in it, such as Sent, perhaps an archive of mail, and for power users multiple accounts or multiple boxes that receive email (e.g. mailing lists). See Figure 1 for an example showing Inbox, Archive and Sent mailbox folders.
It's also possible to use the sidebar to navigate between mailboxes, but for now we'll use the File Browser view. To select a mail folder using the File Browser use the y key to change-folder - this brings up the list where you can select the mail folder to open.
NeoMutt's sidebar capability has lots of options, we're only going to configure the basics:
set sidebar_visible       = yes
set sidebar_width         = 15   # width in screen columns
set sidebar_next_new_wrap = yes  # wrap around the list when scrolling

set mail_check_stats      = yes  # check for new email and show stats
Standard mailboxes
NeoMutt has the concept of a mailbox, which is a file where we receive email, or one we save emails into. We define the mailbox files and that determines what's shown when we change folders (using y) and in the Sidebar view.
To specify the mailboxes:
set spool_file = "/var/mail/<username>"  # folder where new mail appears

set mbox = ~/mail                        # folder into which read mail from the
                                         # $spool_file folder will be appended

set move = ask-no                        # move mail from the $spool_file to $mbox
                                         # automatically

set mbox_type = "mbox"                   # set the mbox type, "mbox" is default

set folder = ~/mail                      # default location of mailboxes
set record = =Sent                       # file to record sent emails in
set trash  = +Trash                      # file to append outgoing messages to
set postponed = ~/mail/Drafts            # file to record postponed emails in
In the introduction we explained that when email is received by a Unix host it's placed into a spool file (often /var/spool/<user> or /var/mail/<user>) for the user. These days we'd commonly call that the 'Inbox' since it's where our new email appears. The spool_file variable tells NeoMutt where to find this file.
Normally, the user's email program will move email from the spool file, which is on a shared resource (i.e. /var/spool is shared with all users), into the users $HOME directory. The mbox setting defines which folder to use when storing the user's personal email files. Notice that both expect the type mailbox which is a path, it doesn't need to be in a string.
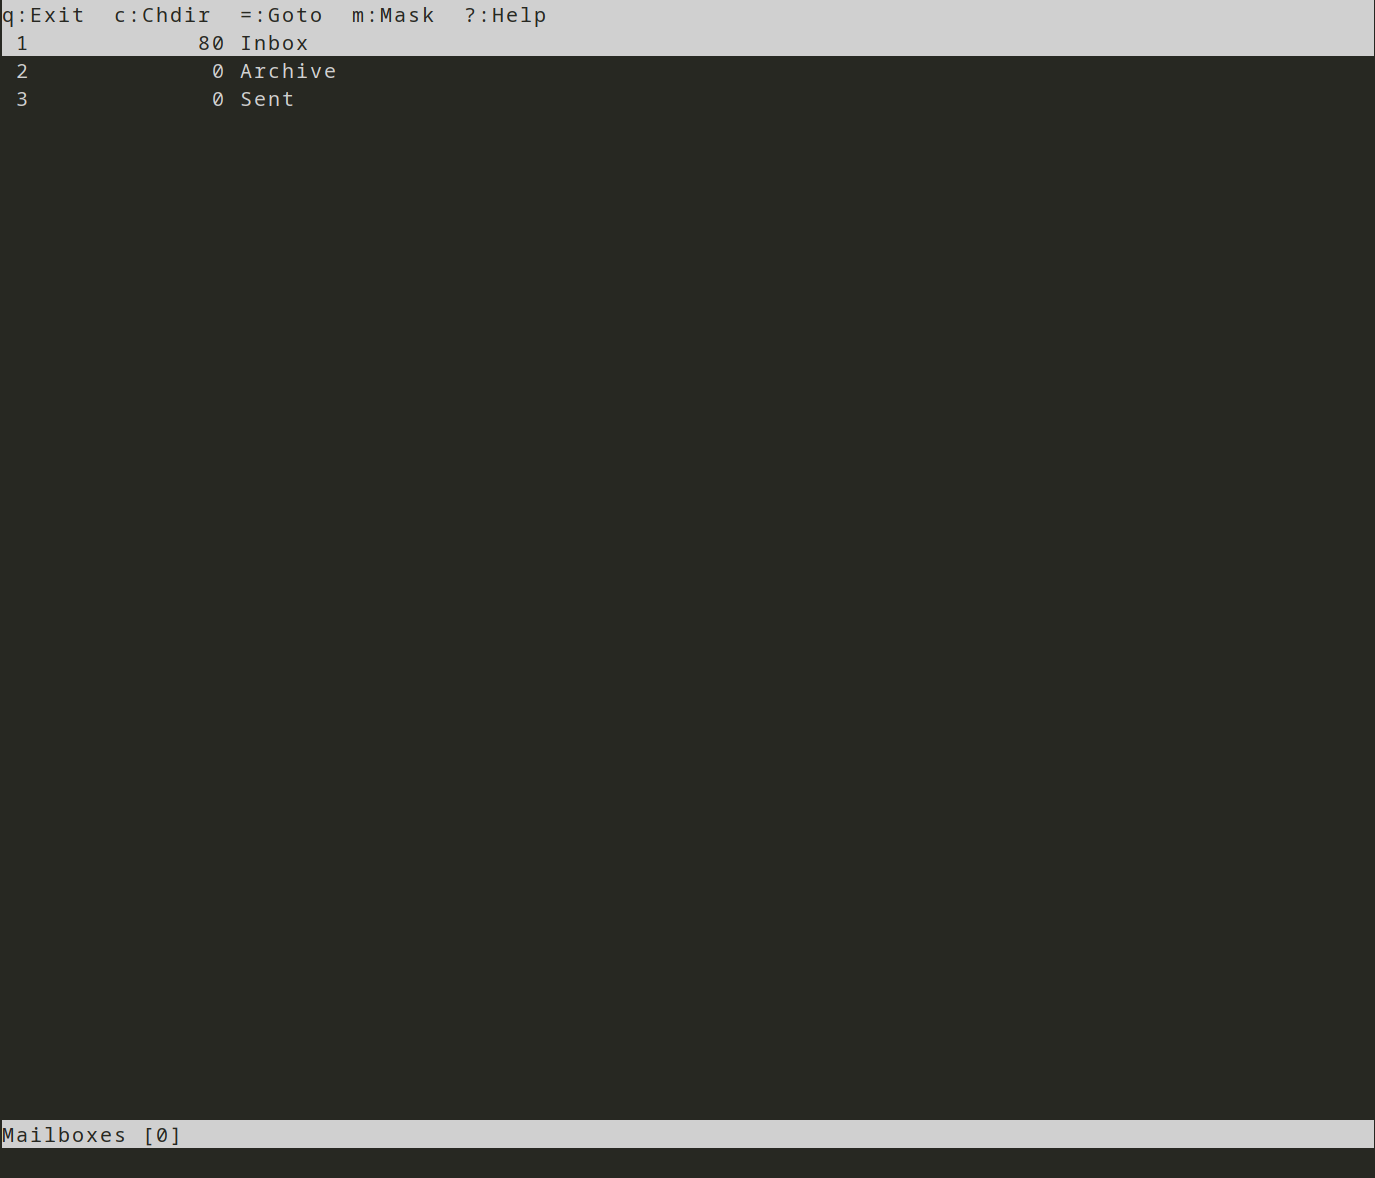
Figure 5 (click to enlarge): File browser - changing mailbox
The next option is when to move email from the spool folder into the users personal mail folder. In the documentation this is specified as a quadoption which means it can be set to yes, no, ask-yes or ask-no.
Then we set what type of mailboxes to use, using the mbox_type option. The two common ones are mbox and maildir. The default type is mbox where all email for a particular mailbox is kept in a single file - it's used by most email programs, so if you want to use multiple CLI email clients this is a good option. The other option is maildir where individual emails are files within a directory structure, it's nice as it's compatible with file-level synchronisation tools (e.g. rsync) and it doesn't have any state, but it can be slower without caching.
We now need to define our mailboxes; understanding how this works is key to working with NeoMutt.
At a minimum we'll have a file for Sent email, one for Drafts and an Archive of emails we've dealt with. If you have lots mailboxes then it can be annoying defining the path to each one which is why Neomutt has Mailbox shortcuts for defining the locations. With so few mailboxes it's not really necessary, but I found it's quite confusing when learning and reading other people's configuration - so it's worth explaining!
First, we set a default location for our mailboxes using the folder configuration variable, this accepts a mailbox type with a path. In this example, I'm using ~/mail as that's the most common default for CLI clients, NeoMutt actually defaults to using ~/Mail, and on my own laptop I use ~/.mail - so use what you like!
The record variable controls where emails that you send will be recorded (i.e. a Sent folder). Here it's defined as =Sent, the equals sign is a Mailbox shortcut so that NeoMutt inserts the $folder location - this makes the $record variable expand to ~/mail/Sent.
The equals sign and the plus sign are the most common Mailbox shortcuts used and they both mean the same thing - the directory that the $folder variable is pointing at.
The trash setting is a folder where deleted email will be placed, for this example I've used +Trash which will expand to ~/mail/Trash. And postponed is a folder where email drafts are placed, which I've set as ~/mail/Drafts to show how a full path can also be used.
Detecting new mail
The next step is to use the mailboxes command to configure the mailboxes that Neomutt should poll for new email, and show in the sidebar. The NeoMutt Guide puts this under Advanced Usage, New Mail Detection. Here's a simple configuration:
mailboxes -label Inbox -notify -poll ! \
          -label Archive -nonotify -poll ~/mail/saved-messages \
          -label Sent -nonotify -nopoll =Sent
The mailboxes command specifies which folders should be regularly checked for new email (the poll/nopoll switch), and whether the UI should notify the user if there's new email in that folder (the notify/nonotify switch).
The first line is to specify the spool_file, since we would normally call that the Inbox I've given it the -label Inbox. Neomutt will check for new email due to the -poll switch, and will notify the user when there's new email due to the -notify switch. The last parameter is an exclamation mark which is another Mailbox shortcut that expands to 'the spool file' (we set this earlier to /var/mail/<username>).
To specify the second mailbox we could create a new line with the mailboxes command at the start as NeoMutt will merge multiple mailboxes commands together. The other option, which I'm using, is to escape the new line and continue.
Rather than use a magic folder shortcut for the Archive folder it's specified at the end as ~/mail/saved-messages. Since the Archive does receive mail (mail that's moved from the spoolfile to the archive), it's set to poll so that there will be a regularly updated count of mail in it, but as I don't want to be notified of new email in it the -nonotify switch is set.
Finally, the Sent folder definition is using the equals sign Mailbox shortcut (so expands to ~/mail/Sent) and there's no need for a count of email or to alert the user of new mail.
Now, when Neomutt starts, it will show these three mailboxes in the left folder bar, to switch to one of them use y and change to the one that you want.
Getting help
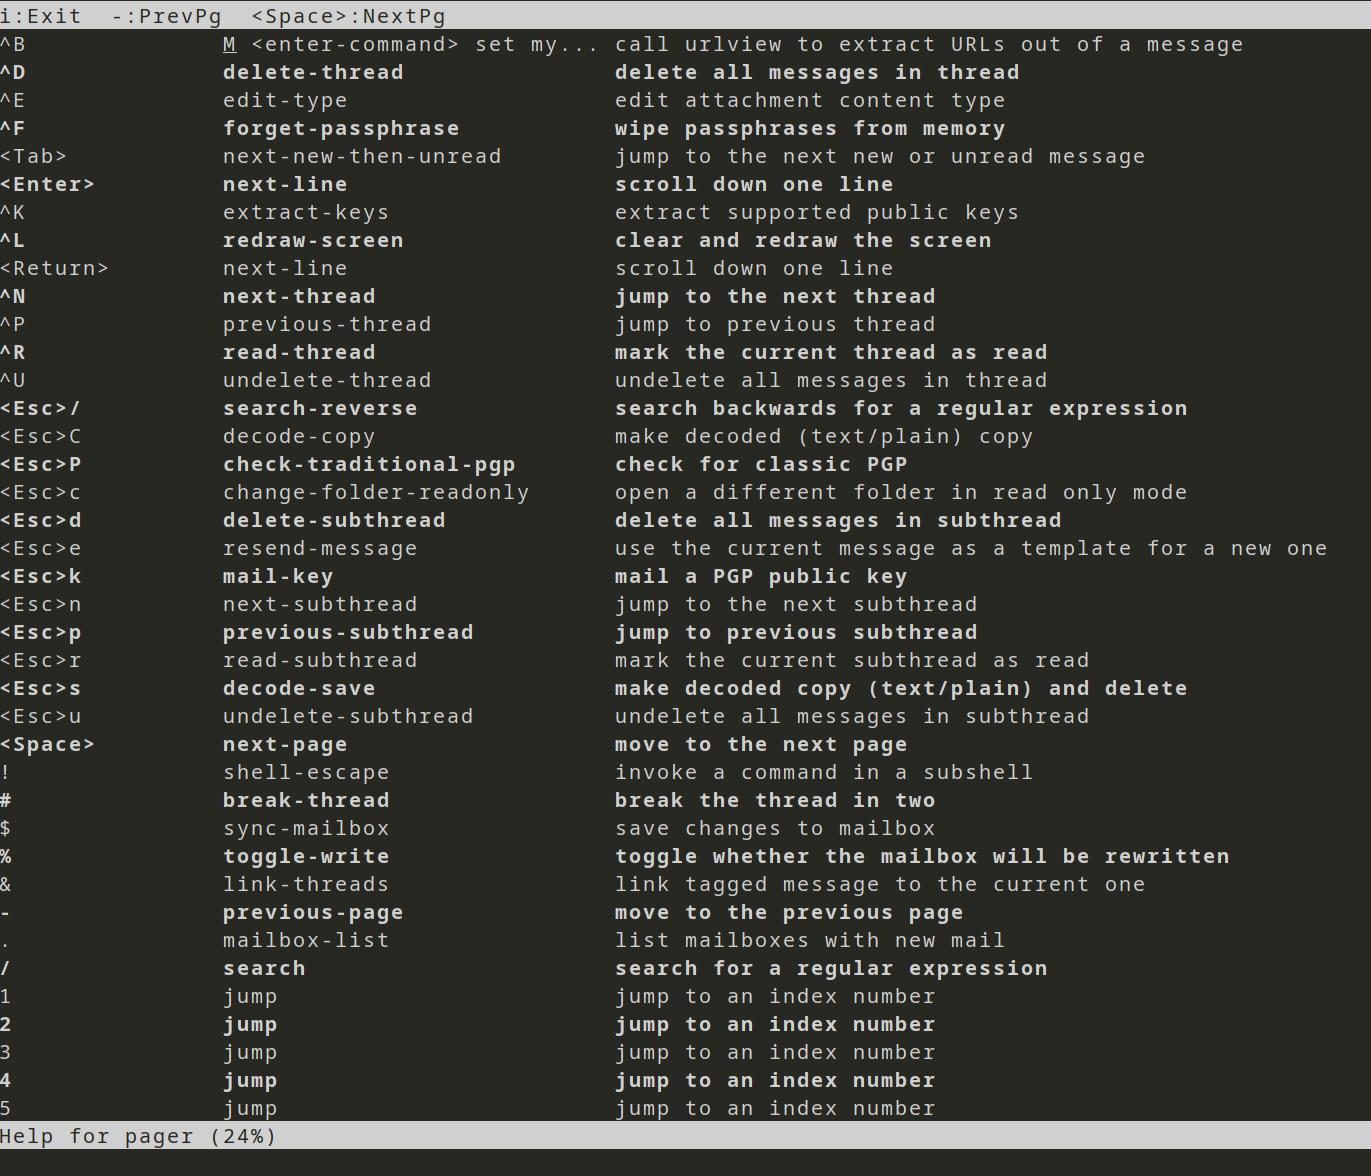
Figure 6 (click to enlarge): NeoMutt help showing keyboard shortcuts
There's no doubt that learning a complex email client like NeoMutt takes a while!
The first think to know is that hitting <Ctrl>g will interrupt the current action.
For information on the keyboard shortcuts that are available for a particular menu use ? which will display a list, see Figure 6.
The NeoMutt Guide is very readable, particularly the Getting Started section which describes the menus and the main keyboard shortcuts. I highly recommend investing some time in this part, even if reading the rest of the Guide is too much.
To understand the specific enhancements that NeoMutt adds to Mutt see the Features section.
In my experience writing down, and having to hand, just a few of the most important keyboard shortcuts will do a lot to accelerate the initial learning.
Email like it's 1995
That's it for doing email like it's 1995 ... in 2025! We've covered all the basics of configuring NeoMutt for use in a multi-user UNIX environment. Using this set-up we can use NeoMutt on SDF or any other of the free shell hosts (examples are Blinkenshell and Tildeverse).
It might seem bizarre to cover reading email on a remote UNIX host, but by doing so we've covered the foundations of configuring NeoMutt and particularly how to set-up mailboxes. Also, why it thinks the inbox is called a spoolfile! Next time we'll cover using NeoMutt as a local email client (e.g. on a laptop) and connecting to a remote email store using IMAP.
Posted in Tech Saturday 17 May 2025
Tagged with tech ubuntu guix email neomutt